Dev blog #154
31.03.2017

Hello everybody,
First, let's start with a short overview of the current development progress. We prepare for beta-test of the new version 2.009 release candidate. Implementation of the Open VR API is nearly finished and we're 'polishing' the new features, including some that aren't directly related to VR. In the meantime, engineer department works on IL-2 mod. 1943 and Spitfire MkVb flight models, while artists are making 3D models of Hs-129 and Yak-7b.
Here comes the main hero of the today Dev Diary - IL-2 mod. 1943 aiming sight. Starting from early 1943, PBP-1 collimator sights were gradually replaced by simple VV-1 (Vizier Vasilyeva - first) mechanical sights on IL-2s. It is commonly believed that PBP-1 aiming sights caused many injuries during emergency landings that were especially frequent among Sturmovik pilots. While being very simple from a technological point of view, this aiming sight actually was more capable than VV-1 was. For example, it could be used for:
- aiming at air targets;
- aiming rockets at ground targets from different distances;
- low altitude level bombing.
Today we'll tell you how to aim using VV-1 sight.
Aiming at air targets using VV-1 sight
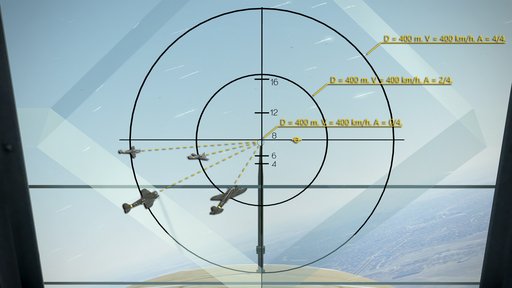
There are special markings on the IL-2 mod. 1943 windshield - crosshairs and two special oval rings. These ovals are drawn in a way so when pilot's eye is correctly positioned on the aiming line 0.5 meters behind the windshield, they look like round concentric rings. When at this position, a pilot needs to align the main crosshairs with the bead to hit a target 400 meters away flying at 400 km/h speed (same as the IL-2 speed). This sight can also help to estimate the required lead depending on the target aspect angle:
- Target with aspect angle 0/4 behind (pursuit shooting) should be placed at the center of the sight;
- Target with aspect angle 2/4 behind (shooting in 45° turn) should be positioned on the inner ring facing the sight center;
- Target with aspect angle 4/4 (moving perpendicularly at 90°) should be positioned on the outer ring facing the sight center.
On these two screenshots you can see these lines and how targets are looks like at 400 meters:
Aiming rockets at ground targets using VV-1 sight
Unlike PBP-1 aiming sight that could be used to aim rockets at ground targets at 800 meters or less, VV-1 includes additional horizontal lines for different ranges. A pilot needs to prepare his ground attack run early to achieve 350-450 km/h speed at 30 diving angle (so he should begin the dive from at least 1500 meters altitude, reduce airspeed to 220-250 km/h and maintain low throttle while diving).
To aim, a pilot should decide at what range he will launch the rockets, position his eye on the aiming line, then align the bead with a chosen horizontal range mark and fire rockets when this distance is achieved. You can see the aiming process on the following screenshots:
Low altitude level bombing using VV-1 sight
While usually Sturmoviks dropped their bombs while diving, dispersing large amounts of bomblets required level bombing from low altitudes. A special aiming sight was needed since the aircraft engine cowling blocked a pilot's view to a target. VV-1 aiming sight has special horizontal lines on the windshield and curves on the engine cowling that allow a pilot to determine a moment when he should release the bombs. This is how it works:
A pilot should choose a target and determine the approach direction (if he engages a transport column or another extended target, approach direction should be chosen along its length). In addition, he should note a reference landmark at 300-500 meters distance to the side of the target, perpendicular to the approach direction. This landmark is needed to determine when to drop the bombs.
A pilot should fly to the point where he will begin the bombing run, 3-5 km away from the target. He should approach this beginning point at a chosen bombing altitude (50, 100, 200 or 300 meters) and 360 km/h speed;
After turning to the approach direction, a pilot should maintain the approach direction, a chosen bombing altitude and 360 km/h speed.
During the bombing run, a pilot should position his head correctly to aim the bombs: one of the two lines on the windshield should be aligned with a corresponding altitude curve on the engine cowling (PageUp and Insert keyboard keys could be used for this).
Bombs should be released when the imaginary continuation of this horizontal line passes the previously chosen reference landmark to the side. Here are several screenshots that show the correct pilot head positions for different bombing altitudes and bomb release times.
Bombing altitude 300 meters. Lower line on the windshield should be aligned with the 1st (rear) line on the engine cowling:
Bombing altitude 200 meters. Lower line on the windshield should be aligned with the 2nd line on the engine cowling:
Bombing altitude 100 meters. Upper line on the windshield should be aligned with the 3rd line on the engine cowling:
Bombing altitude 50 meters. Upper line on the windshield should be aligned with the 4th (front) line on the engine cowling:
VV-1 aiming sight allows to launch rockets and drop bombs with adequate accuracy during calm and warm weather. However, it should be noted that crosswind complicates the aiming of rockets and bombs significantly. In addition, at low temperatures (during winter) and low altitudes the true air speed is significantly less than indicated air speed. There was no universal method to take these errors into account, so bombing during bad weather required a skilled pilot.


